
The technical attributes and quality assessment criteria for residential proxy IPs have been systematically outlined elsewhere. For teams managing cross-border e-commerce stores, performing ad verification, or building data-collection pipelines, the practical question is different: in concrete operational workflows, how should residential proxy IPs be provisioned and used, and what specific actions should be taken at each step?
This article skips the theoretical introduction and dives straight into four typical business scenarios. Each scenario is broken down into actionable steps and configuration highlights. Examples reference how IPFLY’s residential proxy resources can be applied during these processes.
Operational Steps for Multi-Store Cross-Border E-commerce Account Management
Cross-border e-commerce teams often manage multiple store accounts across different platforms. Platform risk systems continuously evaluate login IP consistency, geographic alignment, and reputation. If an account’s login IP jumps frequently between regions or shares the same exit address with other accounts, the risk of account linkage rises significantly.
The core operational logic to address this is straightforward: provide each store account with an independent, stable outbound network address and maintain it consistently over time.
Step 1: Define Each Account’s Target Market and Exit Requirements
Before any technical configuration, determine each store account’s target market. For example, a U.S.-targeted Amazon store should use a U.S. outbound IP; a Rakuten store targeting Japan should use a Japan-based IP. The store’s market defines the geographic requirements for residential proxy IPs and forms the basis for all subsequent configuration decisions.
Step 2: Obtain Static Residential Proxy Resources and Bind to Accounts
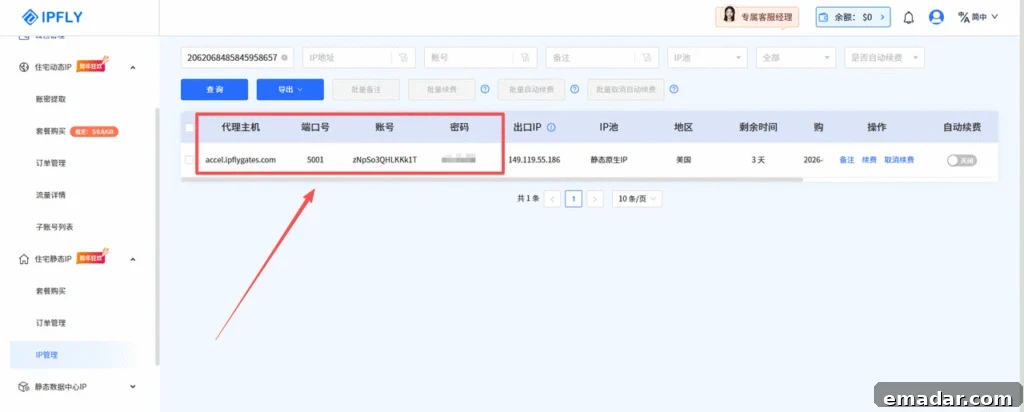
Assign a dedicated static residential IP to each store account. Choose proxy resources filtered by country or city to ensure the exit address matches the store’s operating region. When acquiring proxies, record the proxy host, port, username, and password for later configuration. Residential proxy services generally support HTTP, HTTPS and SOCKS5 protocols.
Step 3: Create Isolated Profiles in a Fingerprinting Browser and Configure the Proxy
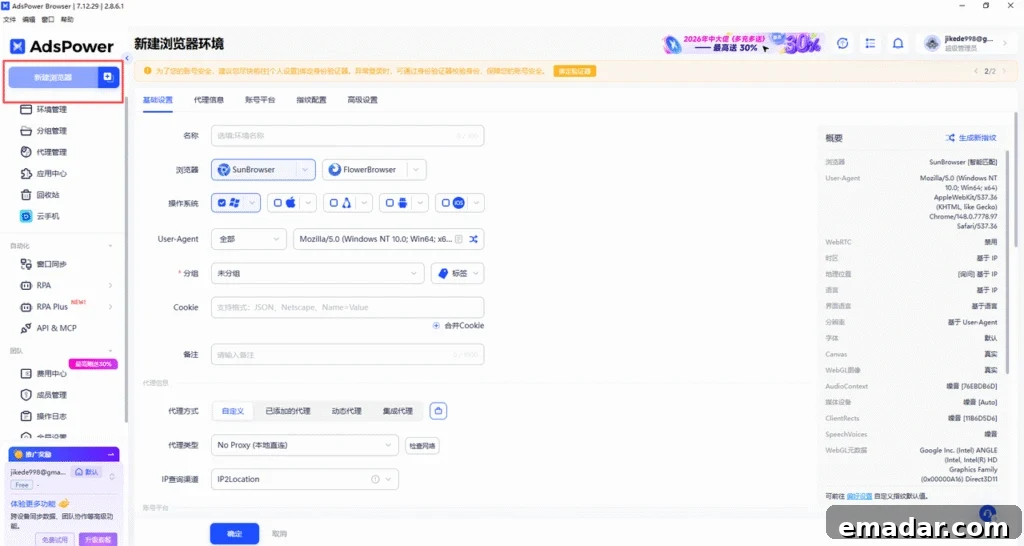
Managing multiple e-commerce stores typically requires fingerprinting browsers to achieve device-level isolation. In a fingerprinting browser, create a new profile and set the proxy type to match the acquired proxy (HTTP, HTTPS or SOCKS5). Enter the proxy host and port and supply the username and password if required. Use the browser’s proxy test feature to verify connectivity and ensure the detected IP geolocation matches the target market before saving the profile.
Step 4: Bind the Account and Establish an Operational Baseline
Log into the store account from the configured browser profile. After login, keep the outbound IP unchanged for at least 48 hours to allow behavior data to accumulate naturally in the target region. During this period, use basic platform functions such as browsing and message checks, and avoid large or sudden operations that could trigger risk detection. For tasks requiring long-term stable IPs—such as account management and automated social accounts—static residential proxies are usually the better choice.
Operational Steps for Ad Geo-Verification
Marketing teams need to verify how ads appear from the perspective of real users in target markets: which creatives display, whether localization and targeting rules apply correctly, and whether landing pages are consistent. Local IPs often determine which creative or targeting variant is shown. Using residential proxies from the target market ensures the verification results reflect what actual local users see.
Step 1: Define Verification Targets and Geographic Granularity
Decide which countries, regions, or cities require verification. A U.S. campaign might require checks in New York, Los Angeles and Chicago. The geographic granularity determines the proxy selection strategy.
Step 2: Configure Proxy in Verification Tools and Make Requests
Configure residential proxies in your verification tool or custom scripts. Ensure headers such as Accept-Language match the proxy’s locale to reduce inconsistencies that could trigger detection.
import requests

proxy = "http://username:password@proxy-host:port"
proxies = {"http": proxy, "https": proxy}

headers = {
    "User-Agent": "Mozilla/5.0 (Windows NT 10.0; Win64; x64)",
    "Accept-Language": "en-US,en;q=0.9",
}

resp = requests.get("https://example.com/ad-page", proxies=proxies, headers=headers, timeout=15)
print(resp.status_code)
Match Accept-Language and other locale signals with the proxy’s geographic region to lower the chance of anomalies.
Step 3: Capture and Compare Ad Creative Results
After loading the ad page from each target city, capture screenshots of the creative, the localized content, and the landing page’s first screen. Compare differences across cities—creative cropping, fold position, redirect links and form availability. A complete verification flow involves accessing ads via desktop and mobile paths from residential proxies, capturing results, comparing creatives and landing pages, and reporting discrepancies to the creative or landing page teams.
Step 4: Batch Verify Across Multiple Cities
For tasks covering many cities, rotating residential proxies with the option to select by country or city is most efficient. Sticky session features help maintain a consistent IP during a single verification sequence so screenshots and comparison steps are not interrupted by IP changes.

Operational Steps for Data Collection and Price Monitoring
Price monitoring and competitor data collection require frequent access to e-commerce sites for public product information. Data-center IP ranges are easier for platforms to identify and block under high-frequency requests. Residential proxy IPs, with dispersed and consumer-like address characteristics, make scraping requests resemble real user behavior and reduce the likelihood of access restrictions.
Step 1: Choose a Collection Tool and Configure It
Select a data-collection tool that matches your team’s technical skills. No-code tools like Octoparse reduce setup complexity for non-developers, while developers can build custom scrapers. For no-code tools, create a new task and enter the target product page URL as the starting point.
Step 2: Configure Residential Proxies in the Collector
In the tool’s anti-blocking or proxy settings, enable proxy usage and add your residential proxy credentials in the required format, typically host:port:username:password. Configure rotation intervals and choose between session-sticky or per-request rotation according to your strategy.
Step 3: Define Extraction Rules and Pagination
Specify the fields to extract (title, price, stock status, ratings, etc.), use “select all similar elements” to capture lists, and set pagination rules to traverse multiple pages automatically by identifying the next-page selector.
Step 4: Run the Crawl and Export Data
Run the task in the selected mode and export results to spreadsheets for analysis. Using request rotation with appropriate intervals balances collection efficiency and the appearance of legitimate browsing patterns, improving long-term reliability.
Operational Steps for Social Media Account Operations
Social platforms evaluate account login environments using signals beyond IP—browser fingerprint, timezone, and language preferences all matter. When these signals contradict the proxy’s geographic location, platforms may flag activity as suspicious. Multi-account teams must achieve both device isolation (via fingerprinting browsers) and network isolation (via residential IPs).
Step 1: Plan Separate Environments for Each Social Account
Create one browser profile and one dedicated residential IP per social account. For example, use a U.S. residential IP for an account targeting North America and a Japan-based IP for an account targeting Japan. The number of accounts determines how many isolated environments you need.
Step 2: Obtain and Verify Static Residential Proxy Resources
Assign a static residential IP to each account and verify the IP geolocation matches the target market. City-level location options enable more precise alignment with the account’s intended audience.
Step 3: Align Browser Environment Signals with the Exit Address
In each browser profile, set the browser language and system timezone to match the proxy’s region. Configure the proxy type and credentials, start the profile and confirm the detected IP location matches the target market before logging in.
Step 4: Log In and Monitor Stability
Log into the social account within the configured environment and maintain the same settings for the first 48 hours to allow natural behavior records to build. Residential proxies should be chosen based on the account lifecycle—registration, nurturing, livestreaming or advertising—to maximize operational reliability.

Conclusion: Scenario-Based Logic for Residential Proxy Configuration
The workflows across these four scenarios point to a unified configuration logic: first clarify the business requirements for outbound network identity, then select the appropriate residential proxy type and session mode, and finally complete technical configuration and verification.
Cross-border account management demands the highest IP consistency; static residential proxies combined with fingerprinting browsers form the standard approach. Ad verification benefits from flexible, region-filterable rotating residential proxies. Data collection and price monitoring require rotation strategies with controlled intervals to maintain both efficiency and credibility. Social media operations require synchronizing browser fingerprint signals—language and timezone—with the proxy’s geolocation to avoid detection.
Choose residential proxy resources that match each business scenario’s needs. Services that allow filtering by country and city and that offer both static and rotating residential proxy options make it easier to build stable, credible outbound network identities for e-commerce management, ad verification, data collection, and social media operations.
To set up account access and proxy environments, create provider accounts through the provider’s registration entry and select static or rotating residential proxies filtered by country or city as appropriate.
Provider resources typically include:
- Home page and product overview (provider account and dashboard)
- Rotating residential proxies (useful for multi-region ad verification and wide-area testing)
- Static residential proxies (best for long-term account stability and identity persistence)
- Data center proxies (when high throughput without strong residential characteristics is acceptable)