
Are you using Ubuntu and need to navigate the internet through a proxy? Unsure how to configure it?
Whether your goal is to access restricted content, connect to a company VPN, or set up a robust network environment for cross-border e-commerce, configuring proxy settings on Ubuntu is straightforward and achievable!
This comprehensive guide will walk you through the step-by-step process of setting up HTTP/HTTPS and Socks5 proxies on your Ubuntu system, ensuring a smooth and secure online experience.
Why Configure a Proxy on Ubuntu?
Ubuntu, as one of the most popular and versatile Linux distributions, is widely adopted by developers, system administrators, and professionals in cross-border industries. Its flexibility and open-source nature make it an ideal platform for a myriad of tasks, many of which benefit significantly from proxy configuration. Here’s why you might need to set up a proxy on your Ubuntu machine:
- Accessing Geo-Restricted Content: Many websites and online services implement geographical restrictions, limiting access based on your IP address. A proxy allows you to route your internet traffic through a server located in a different country, effectively bypassing these regional blocks and accessing content that would otherwise be unavailable. This is crucial for scientific research, market analysis, and general browsing.
- Enhanced Privacy and Anonymity: When you connect to the internet directly, your IP address is visible to every website you visit. Proxies act as an intermediary, masking your true IP address and providing a layer of anonymity. This is particularly important for individuals concerned about online privacy and those operating in environments where internet censorship or surveillance is a concern.
- Secure Company Network Access: Many organizations use proxy servers as a security measure, requiring employees to connect through them to access internal resources or the internet. Configuring a proxy on your Ubuntu system ensures compliance with company policies and secure access to sensitive internal networks.
- Facilitating Cross-Border E-commerce Operations: For businesses engaged in international e-commerce, proxies are invaluable. They enable users to:
- Scrape data from overseas websites for market research, competitor analysis, and price monitoring.
- Manage multiple accounts on international platforms like TikTok, Amazon, Reddit, eBay, or Walmart, simulating different geographical locations to avoid flagging or restrictions.
- Test website functionality and user experience from various regions to ensure optimal performance for global customers.
- Development and Testing: Developers often use proxies to test applications under different network conditions, simulate user locations, or debug network traffic. This helps in identifying and resolving geo-specific bugs or performance issues before deployment.
- Downloading Region-Specific Software or Updates: Some software or operating system updates might be rolled out gradually or be region-locked. A proxy can help you access these resources by making it appear as if you are connecting from the eligible region.
- Bypassing Internet Service Provider (ISP) Throttling: In some cases, ISPs may throttle bandwidth for certain types of traffic or websites. A proxy can sometimes help circumvent these restrictions by encrypting or redirecting your traffic, making it harder for the ISP to identify and throttle specific data streams.

1. Graphical User Interface (GUI) System Proxy Setup (Ideal for Beginners)
For users who prefer a visual approach, Ubuntu’s desktop environment offers a straightforward way to configure system-wide proxy settings. This method is perfect for beginners and typically applies to applications that respect the system’s network settings, such as web browsers, email clients, and many desktop applications.
- Open “Settings”: Click on the “Activities” overview in the top-left corner, search for “Settings,” and open the application. Alternatively, click the system menu in the top-right corner (usually showing Wi-Fi, battery, volume icons) and select “Settings.”
- Navigate to Network Proxy: In the Settings window, scroll down the left-hand sidebar and select the “Network” option. On the right panel, locate and click on the “Network Proxy” entry.
- Choose “Manual” Proxy Configuration: By default, the proxy setting might be set to “Off” or “Automatic.” Select the “Manual” radio button to enable custom proxy settings.
- Enter Your Proxy Information: You will see fields for different proxy types. Carefully fill in the details provided by your proxy service provider:
- HTTP Proxy: Enter the IP address and port number in the format
ip:port(e.g.,192.168.1.1:8080). This proxy handles standard web traffic. - HTTPS Proxy: Similar to HTTP, enter
ip:port. This handles secure web traffic. Often, the same proxy server and port can be used for both HTTP and HTTPS. - Socks Host: Enter
ip:portfor Socks proxy. It is highly recommended to use SOCKS v5 for better performance and security, as it supports both TCP and UDP connections, making it more versatile for various applications.
- HTTP Proxy: Enter the IP address and port number in the format
- Configure for Multiple Proxy Types: If your proxy service uses the same IP and port for all proxy types, you can check the “Use the same proxy for all protocols” option. If you have different proxy servers or ports for HTTP, HTTPS, and Socks, ensure this box is unchecked and fill in each field separately as required.
- Apply Settings: After entering all the necessary information, click the “Apply” button located in the top-right corner of the window. In some Ubuntu versions, simply closing the window might apply the settings automatically. Your new proxy settings should now be active.
💡 Important Tip: This GUI method primarily affects applications that respect the system-wide proxy settings, such as your web browser (Firefox, Chrome), or email client. However, it often does not apply to command-line tools or terminal applications like curl, wget, or the apt package manager. For these, you’ll need to configure environment variables or specific application settings.
2. Terminal Environment Variable Setup (Essential for Developers & Power Users)
For developers, system administrators, and power users who frequently work in the terminal, configuring proxy settings via environment variables is the preferred method. This ensures that command-line tools and scripts like curl, wget, and even some development tools route their traffic through the specified proxy.
The general syntax for setting proxy environment variables includes the protocol, an optional username and password for authenticated proxies, the IP address, and the port:
export http_proxy="http://username:password@ip:port"
export https_proxy="http://username:password@ip:port"
export ftp_proxy="http://username:password@ip:port"
export socks_proxy="socks5://username:password@ip:port"
export ALL_PROXY="socks5://username:password@ip:port" # A generic proxy setting
If your proxy does not require authentication, you can simplify the command:
export http_proxy="http://127.0.0.1:8080"
export https_proxy="http://127.00.1:8080"
export socks_proxy="socks5://127.0.0.1:1080"
export ALL_PROXY="socks5://127.0.0.1:1080"
Note: It’s good practice to set both lowercase (`http_proxy`) and uppercase (`HTTP_PROXY`) versions as some applications might only recognize one format.
export http_proxy="http://proxy.example.com:8080"
export HTTP_PROXY="http://proxy.example.com:8080"
export https_proxy="https://proxy.example.com:8080"
export HTTPS_PROXY="https://proxy.example.com:8080"
export socks_proxy="socks5://proxy.example.com:1080"
export SOCKS_PROXY="socks5://proxy.example.com:1080"
export ALL_PROXY="socks5://proxy.example.com:1080"
export NO_PROXY="localhost,127.0.0.1,.localdomain" # Optional: specify hosts that should bypass the proxy
Temporary vs. Permanent Configuration:
✅ Temporary Configuration: When you execute the export commands directly in your terminal, the proxy settings are only valid for the current terminal session. If you close the terminal window or open a new one, these settings will be lost. This is useful for one-off tasks or testing.
✅ Permanent Configuration: To make your proxy settings persist across all new terminal sessions, you need to add these export commands to your shell’s configuration file. The most common files are:
~/.bashrc: For users of the Bash shell (the default on most Ubuntu systems).~/.zshrc: For users of the Zsh shell (often used by developers for its advanced features).
Steps for Permanent Configuration:
- Open your shell’s configuration file with a text editor. For Bash, use:
nano ~/.bashrcOr for Zsh:
nano ~/.zshrc - Scroll to the bottom of the file and paste your desired
exportcommands. - Save the file (
Ctrl+O, thenEnterin nano) and exit the editor (Ctrl+Xin nano). - Apply the changes: For the settings to take effect in your current session without restarting the terminal, execute the following command:
source ~/.bashrcOr:
source ~/.zshrc
Now, any new terminal sessions will automatically have these proxy settings applied. To verify, you can use env | grep -i proxy.
3. APT (Package Management) Proxy Settings
The Advanced Package Tool (APT) is Ubuntu’s primary package management system, used for installing, updating, and removing software. By default, APT does not inherit the proxy settings from environment variables or the GUI. If you need to use APT (e.g., sudo apt update, sudo apt install) behind a proxy, you must configure it separately.
To set up a proxy for APT, you need to create or edit a configuration file in the /etc/apt/apt.conf.d/ directory.
- Create or Edit the APT Proxy Configuration File: Open a new file using a text editor with root privileges. A common naming convention is to use a high number to ensure it loads after other configuration files, e.g.,
95proxiesor01proxy.sudo nano /etc/apt/apt.conf.d/95proxies - Add Proxy Configuration: Inside the file, add the following lines, replacing
ipandportwith your actual proxy details:Acquire::http::Proxy "http://ip:port/"; Acquire::https::Proxy "http://ip:port/"; Acquire::ftp::Proxy "ftp://ip:port/"; # If neededIf your proxy requires authentication, include the username and password:
Acquire::http::Proxy "http://username:password@ip:port/"; Acquire::https::Proxy "http://username:password@ip:port/"; - Save and Exit: Save the file (
Ctrl+O, thenEnterin nano) and exit the editor (Ctrl+Xin nano).
Once saved, APT will automatically use these proxy settings for all future operations, such as sudo apt update or sudo apt upgrade. You do not need to restart any services.
To Disable APT Proxy: Simply comment out the lines in the 95proxies file by adding // at the beginning of each line, or delete the file entirely.
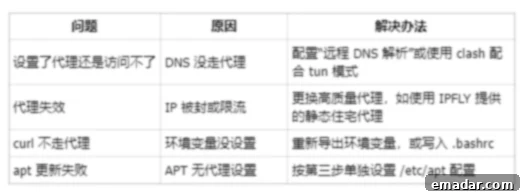
Frequently Asked Questions (FAQ)
Configuring proxies can sometimes be tricky. Here are answers to some common questions you might encounter:
Q1: My proxy isn’t working. How can I troubleshoot it?
A: If your proxy isn’t working, check the following:
- Correct IP and Port: Double-check that you’ve entered the exact IP address and port number provided by your proxy service. A single typo can prevent connection.
- Proxy Server Status: Ensure the proxy server itself is active and accessible. If it’s a private proxy, verify its operational status with your provider.
- Authentication: If your proxy requires a username and password, make sure they are correct and included in the proxy string (e.g.,
http://username:password@ip:port). - Firewall Settings: Your local firewall (UFW on Ubuntu) or network firewall might be blocking outgoing connections to the proxy’s port. Temporarily disable your firewall or add a rule to allow the connection.
- DNS Resolution: Ensure your DNS settings are correct. Sometimes, a proxy might interfere with DNS resolution.
- Application Specifics: Remember that GUI settings might not apply to terminal applications, and vice-versa. Ensure you’ve configured the proxy for the specific context you’re using it in.
Q2: What’s the difference between HTTP, HTTPS, and Socks5 proxies?
A: These are different protocols for proxy servers:
- HTTP Proxy: Designed specifically for HTTP traffic. It understands HTTP requests and can cache web pages. Best for web browsing.
- HTTPS Proxy: While often configured identically to HTTP proxies, it’s typically used for secure (SSL/TLS encrypted) HTTP traffic. A true HTTPS proxy performs a “connect” method, essentially tunneling the encrypted traffic without decrypting it.
- Socks5 Proxy: A more versatile proxy that operates at a lower level (OSI Layer 5). It can handle any type of network traffic, including HTTP, HTTPS, FTP, torrents, and more. Socks5 supports both TCP and UDP connections and offers better anonymity. It’s generally recommended for broader use cases where different protocols are involved.
Q3: How can I verify if my proxy is working correctly?
A: You can easily check your public IP address to see if it matches your proxy’s IP:
- Via Web Browser: If you configured the GUI proxy, open your browser and visit a site like
whatismyip.comorifconfig.me. The IP displayed should be that of your proxy. - Via Terminal: If you configured environment variables, use
curl:curl ifconfig.meThis command will output the public IP address it’s routing through. If it matches your proxy’s IP, your terminal proxy is active.
Q4: Can I use different proxies for different applications?
A: Yes, you can. For instance:
- Your web browser can use the GUI-configured system proxy.
- Specific terminal commands can use environment variables set just for that command (e.g.,
http_proxy="http://ip:port" curl example.com). - Applications with built-in proxy settings (like some VPN clients or communication apps) can be configured independently.
- APT uses its own configuration file.
This flexibility allows you to fine-tune your network environment for various needs.
Q5: How do I unset or remove proxy settings?
A: To remove proxy settings:
- GUI: Go back to “Settings” -> “Network” -> “Network Proxy” and set the configuration to “Off.”
- Terminal (Temporary): Use the
unsetcommand for each variable:unset http_proxy unset https_proxy unset ftp_proxy unset socks_proxy unset ALL_PROXY - Terminal (Permanent): Open your
~/.bashrcor~/.zshrcfile and delete or comment out theexportlines. Then runsource ~/.bashrc(or.zshrc) to apply changes. - APT: Comment out or delete the proxy lines from
/etc/apt/apt.conf.d/95proxies.
Summary
Configuring proxy settings on Ubuntu is a powerful skill that unlocks a world of possibilities, from enhanced privacy and security to seamless access to global content and markets. While it might seem daunting at first, the process is straightforward once you understand the different methods available.
The key to successful proxy configuration on Ubuntu lies in a few critical considerations:
- Identify Your Proxy Type: Determine whether you need an HTTP, HTTPS, or Socks5 proxy. Socks5 is generally recommended for its versatility.
- Choose Your Scope: Decide if you need the proxy for graphical applications (GUI), command-line tools (terminal environment variables), or specific services like APT.
- Ensure Reliability: Always use a trusted and stable proxy service. A flaky proxy can lead to connectivity issues and frustration.
For those involved in cross-border operations or requiring highly reliable and secure network access, selecting a premium proxy provider is paramount. We highly recommend IPFLY’s offerings, which include pure overseas IPs and static residential proxies. These services are fully compatible with HTTP and Socks5 protocols, providing the stable and clean IP addresses necessary to effortlessly configure your Ubuntu system for any global networking requirement.
Register now to claim exclusive offers and elevate your Ubuntu network capabilities!