
Navigating network configuration in Linux is a foundational skill for server administration, deploying proxy nodes, and managing global business operations. While common, it’s also an area where users frequently encounter challenges, especially when differentiating and configuring static versus dynamic IP addresses. A clear understanding of these concepts and their practical implementation is crucial for ensuring stable, secure, and efficient network connectivity.
This comprehensive guide will walk you through:
- How to configure dynamic IP and static IP addresses in Linux systems.
- The practical distinctions and implications of using each type of IP address.
- Determining which IP strategy best suits your specific business requirements and technical infrastructure.
1. Understanding the Core Differences: Static vs. Dynamic IP Addresses
The choice between a static and a dynamic IP address hinges on the specific needs of your Linux system and the services it hosts. Each type offers distinct advantages and disadvantages, making an informed decision critical for optimal performance and security.
What is a Static IP Address?
A static IP address is, as its name suggests, a fixed and unchanging Internet Protocol address. Once assigned, it remains constant until it is manually reconfigured. This permanence makes static IPs highly predictable and ideal for services that require consistent accessibility from external networks.
Key Characteristics of Static IPs:
- Predictability: The IP address never changes, simplifying access and management.
- Reliability: Services linked to a static IP are always reachable at the same address.
- Manual Configuration: Requires explicit setup by a network administrator.
Common Use Cases for Static IPs:
- Deploying Web Servers and Application Servers: Ensures that your website or application is consistently available to users via a fixed domain name, which maps to the static IP. This is fundamental for services like Apache, Nginx, or Dockerized applications.
- Installing Proxy Services (e.g., Squid, Shadowsocks, VPN Servers): Provides a stable endpoint for clients connecting to your proxy or VPN, ensuring uninterrupted service.
- Game Studio Environments and Dedicated Game Servers: Critical for hosting multiplayer games or maintaining persistent game worlds where consistent server addresses are paramount for player connectivity.
- Remote Access and Internal Network Services: Essential for secure shell (SSH) access, virtual private networks (VPNs), remote desktop protocols (RDP), network-attached storage (NAS), and other services that demand reliable, fixed-address connectivity.
- Firewall Rules and Port Forwarding: Easier to configure and maintain security policies when the target IP address is stable.
What is a Dynamic IP Address?
A dynamic IP address is automatically assigned to a device by a DHCP (Dynamic Host Configuration Protocol) server, typically located on your router or provided by your Internet Service Provider (ISP). Unlike static IPs, dynamic IPs can change periodically, often upon network restart, router reboot, or after a specific lease duration expires.
Key Characteristics of Dynamic IPs:
- Automatic Assignment: Requires minimal manual intervention for configuration.
- Flexibility: IPs can change, offering a degree of anonymity for general browsing.
- Resource Efficiency: ISPs can reuse IP addresses, optimizing their IP pools.
Common Use Cases for Dynamic IPs:
- Everyday Office and Home Network Usage: Most home users and small offices rely on dynamic IPs for basic internet access.
- Refreshing Network Environments and Simulating Different User Behaviors: Ideal for scenarios requiring frequent IP changes, such as data scraping, web crawling, or testing applications from various geographical locations.
- Data Collection, Web Scraping, and Anti-Tracking Initiatives: By rotating IP addresses, dynamic IPs help bypass rate limits, avoid IP bans, and enhance anonymity in automated tasks.
- Temporary Access and Testing: Suitable for short-term server deployments or testing where a persistent IP address is not required.

2. How to Configure Dynamic IP Addresses in Linux
Configuring a dynamic IP in Linux is generally straightforward, especially with modern distributions. We’ll primarily focus on Ubuntu/Debian-based systems using Netplan, which has become the standard for network configuration since Ubuntu 18.04. For RedHat/CentOS users, we will also briefly cover traditional methods later.
Method 1: Modifying Netplan Configuration Files (Ubuntu 18.04+)
Netplan uses YAML files to describe network interfaces, abstracting away the complexities of underlying networking tools like `networkd` or `NetworkManager`. This makes configuration consistent and easy to read.
Step 1: Locate and Open the Netplan Configuration File
Netplan configuration files are typically found in the `/etc/netplan/` directory. The filename often starts with a number, like `01-netcfg.yaml` or `50-cloud-init.yaml`. Use `ls /etc/netplan/` to identify the correct file. For this example, we’ll use `01-netcfg.yaml`.
sudo nano /etc/netplan/01-netcfg.yamlThe `sudo` command grants administrative privileges, and `nano` is a simple, command-line text editor.
Step 2: Modify the Configuration for DHCP
Within the file, you need to specify that your network interface (e.g., `eth0` or `ens33` – check your system’s interface name using `ip a`) should obtain its IP address dynamically via DHCP. Ensure your file matches the following structure. Remember that YAML is sensitive to indentation, so use spaces, not tabs.
network:
  version: 2
  ethernets:
    eth0:
      dhcp4: true
If your interface name is different (e.g., `ens33`), replace `eth0` accordingly. The `dhcp4: true` line instructs Netplan to enable DHCP for IPv4 on that specific interface.
After making changes, save the file (Ctrl+O, then Enter) and exit nano (Ctrl+X).
Step 3: Apply the New Configuration
For the changes to take effect, you must apply the Netplan configuration. This command will parse your YAML file, generate the necessary backend configuration files, and activate them.
sudo netplan applyIf there are any syntax errors in your YAML file, `netplan apply` will usually report them, preventing misconfigurations. For safer testing, especially on remote servers, you can use `sudo netplan try`, which will revert changes if connectivity is lost.
Step 4: Verify the Configuration
To confirm that your network interface has successfully obtained a dynamic IP address, use the `ip a` command (a shorthand for `ip address`).
ip aLook for your interface (e.g., `eth0` or `ens33`). If its `inet` address is assigned by your router’s DHCP server, then your dynamic IP configuration is successful. The `inet` line should display an IP address along with its subnet mask (e.g., `inet 192.168.1.50/24`).
3. How to Configure Static IP Addresses in Linux
Setting up a static IP address in Linux is essential for servers and services that require a consistent network presence. This section will guide you through configuring a static IP using Netplan for Ubuntu/Debian systems.
Netplan Configuration Example for Static IP:
Step 1: Edit the Netplan Configuration File
As with dynamic IP configuration, you’ll open the same Netplan YAML file. It’s crucial to ensure there are no conflicting DHCP settings in the file.
sudo nano /etc/netplan/01-netcfg.yamlStep 2: Modify for Static IP Assignment
Replace the content related to your interface with the following structure. You’ll need to customize the `addresses`, `gateway4`, and `nameservers` entries to match your specific network environment. This includes your desired static IP address, subnet mask, default gateway, and DNS servers.
network:
  version: 2
  ethernets:
    eth0:
      dhcp4: no
      addresses: [192.168.1.100/24]
      gateway4: 192.168.1.1
      nameservers:
        addresses: [8.8.8.8, 1.1.1.1]
Let’s break down these critical parameters:
dhcp4: no: Explicitly disables DHCP for IPv4 on this interface, ensuring a static assignment.addresses: [192.168.1.100/24]: This is your chosen static IP address. Replace `192.168.1.100` with the actual IP you want to assign. The `/24` represents the CIDR notation for the subnet mask, equivalent to `255.255.255.0`. You must adjust this based on your network’s subnet configuration (e.g., `/16` for `255.255.0.0`).gateway4: 192.168.1.1: This is the IP address of your default gateway (your router). Your server will send all traffic destined for external networks through this gateway. Ensure this is correct for your network.nameservers: addresses: [8.8.8.8, 1.1.1.1]: These are the DNS (Domain Name System) server addresses. `8.8.8.8` (Google DNS) and `1.1.1.1` (Cloudflare DNS) are public, reliable options. You might also use your ISP’s DNS servers or local network DNS servers.
Save the file (Ctrl+O, then Enter) and exit nano (Ctrl+X).
Step 3: Apply the Configuration
Once the file is saved, apply the changes using the Netplan command:
sudo netplan applyStep 4: Check the IP Address
Verify that your static IP address has been successfully applied to the network interface:
ip aConfirm that the `inet` address for your interface (e.g., `eth0`) now displays your configured static IP address.
Important Considerations:
- Subnet Mask: The CIDR notation (e.g., `/24` for `255.255.255.0`) is crucial. Incorrectly configuring the subnet mask can lead to network isolation or communication issues within your local network. Always match it to your actual network setup.
- IP Conflict: Ensure the static IP address you choose is not already in use by another device on your network and is outside your router’s DHCP pool to prevent conflicts.
- Backup and Remote Access: If you configure incorrectly, your server might lose network connectivity. It’s highly recommended to back up your Netplan configuration file (`sudo cp /etc/netplan/01-netcfg.yaml /etc/netplan/01-netcfg.yaml.bak`) before making changes. For remote servers, ensure you have out-of-band management or a remote console (like provided by cloud providers) to regain access if network connectivity is lost.
- `netplan try`: Use `sudo netplan try` for a temporary application of settings. If connectivity is maintained, you can confirm. If connectivity is lost, Netplan will automatically revert to the previous working configuration after a timeout, providing a safety net.
4. Network Configuration for CentOS / RedHat Systems
While modern CentOS and Red Hat Enterprise Linux (RHEL) versions increasingly support `NetworkManager` and `systemd-networkd`, the traditional `ifcfg` configuration files remain a prevalent method, especially in older or minimal installations. This method involves directly editing configuration files for each network interface.
Configuring Static IP with `ifcfg` files:
Step 1: Identify and Edit the Interface File
Configuration files for network interfaces are located in `/etc/sysconfig/network-scripts/`. The file name typically follows the pattern `ifcfg-interface_name`, such as `ifcfg-eth0` or `ifcfg-ens33`.
sudo nano /etc/sysconfig/network-scripts/ifcfg-eth0Replace `eth0` with your actual network interface name. You can find this using `ip a`.
Step 2: Enter Static IP Configuration
Modify the file to include the following parameters for a static IP address. Adjust the IP address, netmask, gateway, and DNS servers to match your network requirements.
TYPE=Ethernet
BOOTPROTO=static
IPADDR=192.168.1.100
NETMASK=255.255.255.0
GATEWAY=192.168.1.1
DNS1=8.8.8.8
DNS2=1.1.1.1
ONBOOT=yes
Explanation of parameters:
- `TYPE=Ethernet`: Specifies the interface type.
- `BOOTPROTO=static`: Instructs the system to use a static IP configuration (for dynamic, this would be `dhcp`).
- `IPADDR=192.168.1.100`: Your chosen static IP address.
- `NETMASK=255.255.255.0`: The subnet mask for your network.
- `GATEWAY=192.168.1.1`: The default gateway (router) IP address.
- `DNS1=8.8.8.8`: The primary DNS server. You can add `DNS2` for a secondary server.
- `ONBOOT=yes`: Ensures the network interface is activated during system startup.
Save and close the file.
Step 3: Restart the Network Service
For the changes to take effect, you need to restart the network service. On CentOS/RHEL 7 and later, this is done using `systemctl`:
sudo systemctl restart networkOr, if you are using `NetworkManager` (which is common in graphical environments or newer server installations):
sudo systemctl restart NetworkManagerConfiguring Dynamic IP with `ifcfg` files:
To configure a dynamic IP address, you simply need to change the `BOOTPROTO` parameter to `dhcp` and remove the `IPADDR`, `NETMASK`, `GATEWAY`, and `DNS` lines, as these will be automatically provided by the DHCP server.
TYPE=Ethernet
BOOTPROTO=dhcp
ONBOOT=yes
Then, restart the network service as described above.
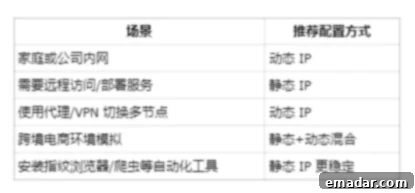
5. How to Determine Which IP Setting Your Network Needs
Choosing between a static and a dynamic IP address is a strategic decision that profoundly impacts your network’s stability, security, and operational efficiency. The optimal choice largely depends on the specific applications, services, and business objectives associated with your Linux machine.
When to Choose a Static IP Address:
Static IP addresses are the backbone of stable, publicly accessible services. Opt for a static IP when:
- Hosting Public-Facing Services: If your Linux server hosts a website, a custom application, an FTP server, or any service that users access over the internet, a static IP ensures consistent availability. Domain names are mapped to these unchanging IPs.
- Running Dedicated Game Servers: Players need a fixed address to connect to.
- Operating Critical Infrastructure: Database servers, internal network storage (NAS), and VPN gateways benefit from predictable addresses.
- Remote Access Requirements: For reliable SSH access or administrative control from outside your local network, a static IP simplifies connection setup.
- Specific Proxy Implementations: Some proxy setups, particularly those requiring a stable outbound IP for whitelisting or consistent client identification, benefit from static IPs.
The primary advantage here is stability and ease of managing DNS records and firewall rules. Any service that needs to be consistently found at the same address should use a static IP.
When to Choose a Dynamic IP Address:
Dynamic IP addresses offer flexibility and a degree of anonymity, making them suitable for scenarios where IP changes are either beneficial or not detrimental:
- General Internet Browsing and Temporary Use: For typical client machines that simply need to access the internet, dynamic IPs are convenient as they require no manual configuration.
- Multi-Account Management (E-commerce, Social Media, Gaming): In environments like cross-border e-commerce, managing multiple TikTok accounts, or running game studios with many player accounts, using a unique IP for each account is critical. Platforms employ sophisticated “risk control” mechanisms that can detect and flag accounts sharing the same IP, leading to bans or restrictions. Dynamic IPs allow for easy rotation and simulation of diverse user behavior.
- Data Scraping and Market Research: Frequent IP changes help bypass rate limits, avoid IP blocking by target websites, and collect data efficiently without revealing a consistent footprint.
- Testing and Development Environments: For temporary servers or development setups where an IP doesn’t need to persist or be publicly accessible.
- Enhanced Privacy and Anonymity: While not a complete privacy solution, dynamic IPs make it harder to consistently track an individual’s online activities across different sessions.
In many cross-border e-commerce, game studio, and multi-account TikTok scenarios, failing to isolate network environments (i.e., using different IP environments) makes accounts highly vulnerable to platform risk control. For instance, IPFLY’s dynamic IP solutions are better suited for scenarios requiring frequent identity switching and simulating varied user behaviors, while static IP solutions are ideal for creating long-term, stable operational environments.
Configuring your Linux network is just the initial step. Achieving truly stable and high-performance proxy IP networks necessitates a high-quality, reliable IP resource pool. Many teams leverage a combination of IPFLY’s static residential proxies and dynamic residential proxies to rapidly simulate global environments and achieve robust account isolation. These solutions are compatible with Linux and various other operating systems, delivering stable performance in critical operations like e-commerce, social media marketing, and gaming.
6. Conclusion: Mastering Linux IP Configuration
Configuring dynamic and static IP addresses in Linux, whether through Netplan for Ubuntu/Debian or `ifcfg` for CentOS/RedHat, is a fundamental and manageable task. The core challenge isn’t the technical commands, but rather understanding the distinct use cases for each IP type and implementing an IP strategy that aligns with your operational goals.
A well-chosen IP strategy is paramount for deploying services, managing multiple accounts, and orchestrating system clusters securely and efficiently. By correctly applying static or dynamic IPs, you can prevent platform bans, ensure service availability, and maintain the integrity of your online operations.
For cross-border sellers, proxy deployers, and developers, mastering these essential network configuration skills lays a solid foundation for advanced network management. Furthermore, partnering with a reliable proxy provider like IPFLY, which offers both static and dynamic residential IPs, can significantly enhance your cross-border operations. IPFLY ensures your accounts benefit from uninterrupted connectivity, no account association, and protection against bans, providing a clean and secure starting point for all your online endeavors.